Invite and manage users
Add a teammate with a role and product access, see them on the Users list, send them an invitation, and edit, disable, or remove a user later.
Before you start
- You need the Admin account role to add or manage users.
- Know which products (for example EDOS or Insights) the new user should be able to access — you can only grant products your account owns.
- Each product has a maximum number of users; adding someone beyond that limit is blocked.
Where the Users list lives
There are two places that show the same list:
- The Users page at
/users. It isn't in the sidebar, but it is where the "New teammate" and "<product>is full" notifications take you, and it is the breadcrumb parent of every user's profile. Its columns are Name, Email, Account, Status, Products, and Last Active (reading "Never" for someone who hasn't signed in yet). - The Users tab on your account page. Open the user menu at the bottom of the sidebar, choose Account, and you land on it.
Both show Add User to account admins.
Steps
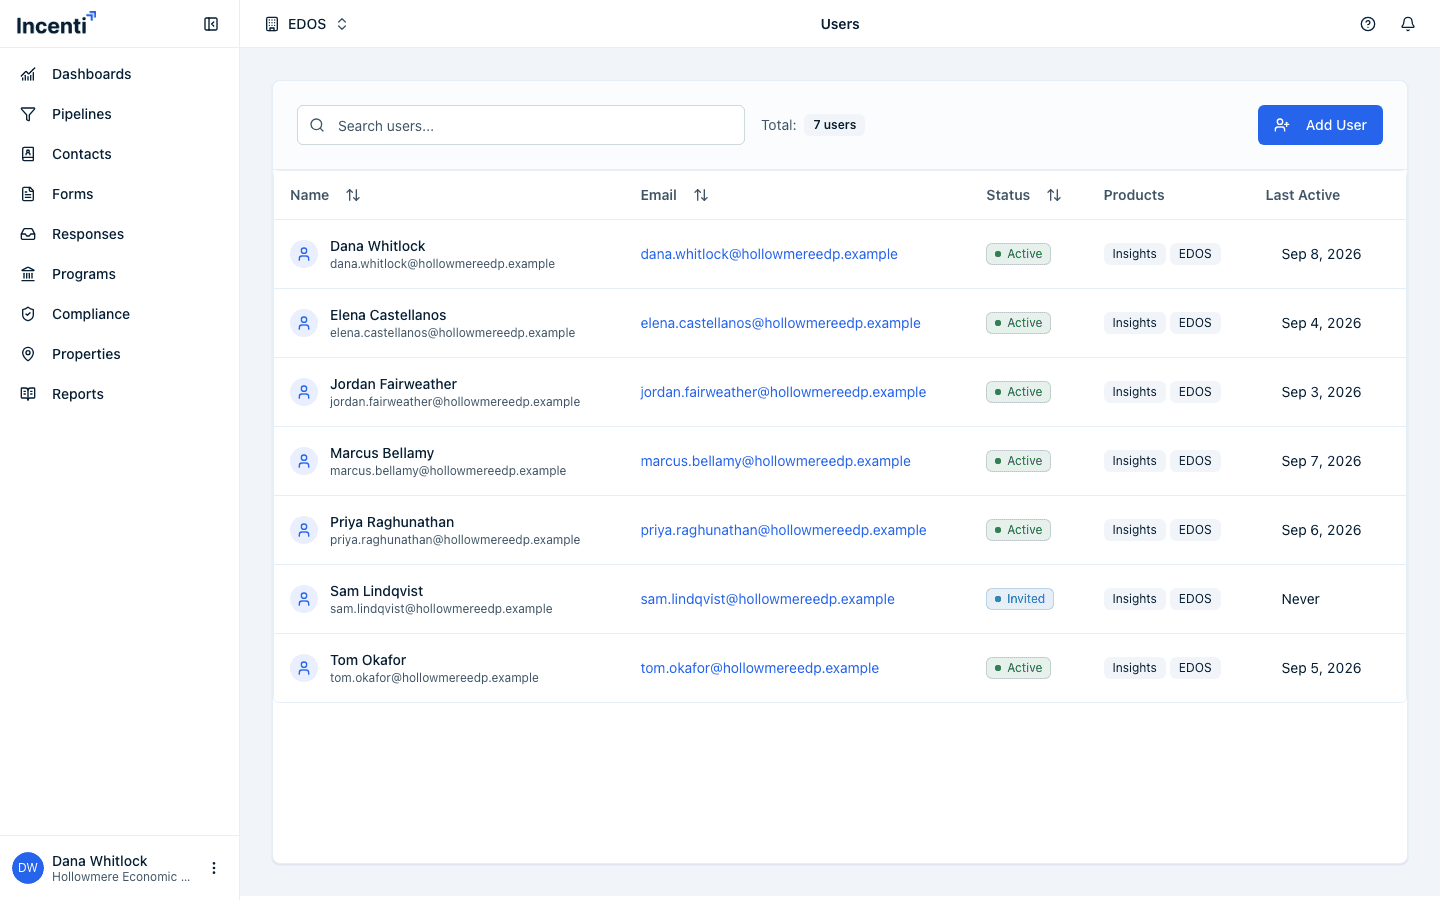
- Open the user menu at the bottom of the sidebar and choose Account. Your account page opens on the Users tab, which lists everyone on the account with their role and status.
- Select Add User. A dialog titled Add User to Account opens.
 3. Fill in First Name, Last Name, and Email. Title,
Mobile Phone Number, and Profile Image (Optional) are optional. A
profile image must be an image file under 5 MB — anything else shows
"Please upload a valid image file" or "Image size must be less than 5MB".
4. Choose an Account Role: Admin or Member. It starts on
Admin, so change it to Member for anyone who shouldn't manage users
and account settings.
5. Under Products, select every product this user should be able to
access. The picker only offers products your account owns, and you must
choose at least one. The note under the field reads "The user can access
only the products selected here."
6. Status is shown but greyed out while you're adding someone — a new user
always starts as Pending. It becomes editable only when you edit an
existing user.
7. Select Create.
8. Send the invitation. Adding a user does not email them by itself. Either
tick the new user in the list and select Send Invitations (1), or open
their profile and select Send Invitation. Confirm the dialog.
3. Fill in First Name, Last Name, and Email. Title,
Mobile Phone Number, and Profile Image (Optional) are optional. A
profile image must be an image file under 5 MB — anything else shows
"Please upload a valid image file" or "Image size must be less than 5MB".
4. Choose an Account Role: Admin or Member. It starts on
Admin, so change it to Member for anyone who shouldn't manage users
and account settings.
5. Under Products, select every product this user should be able to
access. The picker only offers products your account owns, and you must
choose at least one. The note under the field reads "The user can access
only the products selected here."
6. Status is shown but greyed out while you're adding someone — a new user
always starts as Pending. It becomes editable only when you edit an
existing user.
7. Select Create.
8. Send the invitation. Adding a user does not email them by itself. Either
tick the new user in the list and select Send Invitations (1), or open
their profile and select Send Invitation. Confirm the dialog.
The Account Role picker opens on Admin. A teammate added without changing it can manage users, product access, and your account's details.
What happens next
- The new user appears on the Users tab with a Pending status until an invitation is sent, then Invited until they sign in for the first time, then Active.
- The invitation email contains a sign-in link, valid for 24 hours. Later sign-ins work the same way, from the sign-in page. See Sign in to Incenti.
- The first time the new user signs in, every admin on the account gets a "New teammate" notification linking to the Users page.
- If adding the user, or granting them a product, would put that product over its user limit, the change is blocked and you see a message that the product's user limit has been reached, with the support address to contact to add more users.
Managing an existing user
- Select a user on the Users tab to open their profile.
- Account admins can edit the user's name, title, phone, image, and account role from the profile.
- Product Access is managed separately on the profile: select the pencil icon next to Products, check or uncheck products in the picker, then Save. Granting a new product runs the same seat-limit check as adding a user.
- Select Send Invitation to send or resend the invitation email. You are
asked to confirm — "Are you sure you want to send an invitation to
<name>?" — and shown the address it goes to. The bulk dialog notes that "Only users with 'Pending' or 'Invited' status can receive invitations" and tells you how many of your selection were skipped; a success toast reads "Invitations sent to N users". - Select Disable User to block their access ("The user will be prevented from accessing the system."), or Enable User to restore it. A disabled user no longer counts toward any product's user limit.
- System admins at Incenti additionally see a Delete button. Deleting a user removes them from your lists and permanently blocks that email address: it can never be added to Incenti again, on your account or any other. Disable rather than delete anyone who might come back.
Common questions
Q: What's the difference between Admin and Member? A: Account Role on the Add User form offers Admin and Member. Admins can manage users and other account-level settings; members cannot. Both can use every product they're granted. See Roles and permissions.
Q: Why did my new teammate turn out to be an Admin? A: The Account Role picker starts on Admin. If you left it alone when adding them, they're an admin. Open their profile and change the role.
Q: Why is Status greyed out when I add a user? A: Because a new user always starts as Pending — the status moves on its own as you invite them and they sign in. The field becomes editable when you edit an existing user.
Q: I deleted a user by mistake — can I re-add them with the same email? A: No. Adding that address again returns "User already exists", and no admin can clear it. Contact support@incenti.co.
Q: The invitation link expired — do I have to add them again? A: No. Open their profile and select Send Invitation to send a fresh link. Only Pending and Invited users can be sent one.
Q: Where do I see whether an invitation was sent, and when? A: Incenti doesn't show an invitation date. Use the Status column instead: Pending means no invitation has gone out, Invited means one has, and Active means they've signed in. Last Active on the Users page reads "Never" until their first sign-in.
Q: Can I add someone who already has an Incenti login at another organization? A: No. Each email address belongs to exactly one Incenti account. Add them with a different address.
Q: I can't select a product for a new user — why? A: The Products picker only lists products your account owns. If a product is missing, your account doesn't have access to it.
Q: I tried to add a user and got an error about a user limit. What now? A: That product has reached its maximum number of users. Contact Incenti support to add more users, or free up a seat by disabling a user who no longer needs that product. See Seat limits and what happens at the cap.
Q: I added a user but they never got an email. Why? A: Adding a user creates them in Pending status; the email goes out only when you send an invitation. Tick them on the Users tab and select Send Invitations, or open their profile and select Send Invitation.
Related
Last updated on